The software and hardware of the single-chip streamer program written in C language can make eight LEDs turn on in turn, and each lamp is lit and extinguished for 1 second. It is a simple example of controlling an external device using a microcontroller I/O port. Of course, after you have mastered the program, you can fully use your imagination, change the program content and the connection of the lights (such as using optocoupler to drive the relay to control the neon), and make a variety of large-scale lighting billboards with extraordinary changes. .
First, the hardware circuit
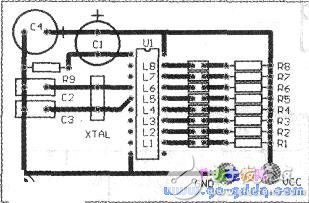
Because the circuit is controlled by a single-chip microcomputer, the circuit is very simple. The schematic diagram of the circuit is shown in the figure below, and the printed board diagram is shown below.
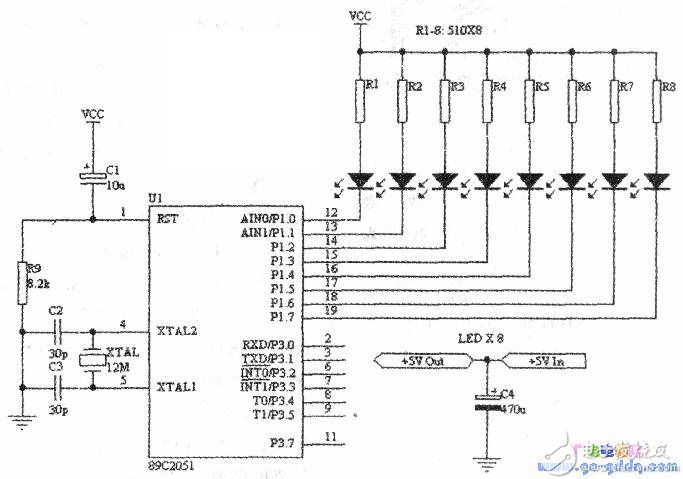
The core part of the circuit is the AT89C2051 single-chip microcomputer. As mentioned above, it has two sets of I/O ports of Pl and P3. We only use the Pl port here, a total of 8 pins. In the figure, Cl and R9 form a typical power-on reset (that is, the microcontroller resets when power is applied), and XTAL, C2, C3 and AT89C2051 on-chip oscillator circuits form a clock oscillator. It is worth noting that the capacity of C2 and C3 cannot be too different from the value in the figure, otherwise it may cause no vibration or unstable oscillation. The frequency of XTAL can be between 4-20MHz. However, the change of frequency will cause the running speed of the program to change, so you need to adjust the parameters of the delay sub-function. In fact, the parameter can be adjusted, but the delay time is no longer 1 second, and the delay time increases as the XTAL frequency decreases.
Second, the software part
The program contains two functions, one is the main function and the other is the delay sub-function. The source program is as follows (for the sake of explanation, we have numbered each line of the program):
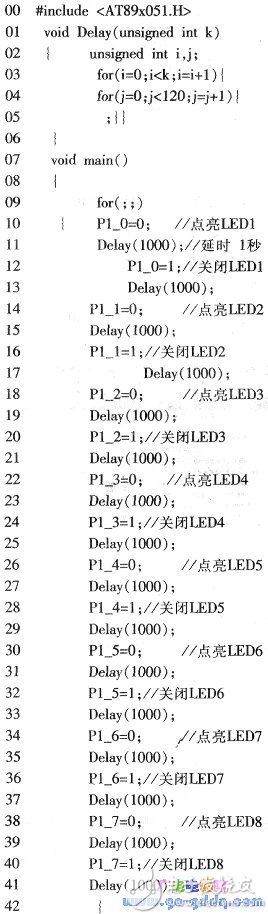

The functions of the program are as follows:
Line 00: Include the AT89C2051 header file "AT89x051.H".
Line 01: Declare the Delay() delay sub-function, which has an unsigned integer parameter k, and the void in front of the function indicates that the function does not return the function value.
Line 02: The beginning of the delay sub-function, and declare two unsigned integer variables i and j.
However, please note that there is no such thing as the previous program, the "{" that represents the beginning of the function is a separate line, but the next line is written together. In fact, when writing a C program, you can write multiple lines of a line. The C compiler considers the end of a line of statements as long as it encounters a semicolon.
Of course, we can't just write a multi-line cooperation line because C program has this feature. When actually writing a C program, we should still develop a good program writing habit and write according to the principles of convention.
Line 03: Declare the for() loop. The initial condition of this loop is i=0, the termination condition is i<k, the loop count is once per loop, and the variable i counted by hand is incremented by 1. Therefore, the number of loops in this loop is k times. Thus, as long as the value of k is changed (i.e., the value of the parameter k of the Delay() delay sub-function is changed), the number of loops can be easily controlled to obtain different delay times.
Line 04: Declare a new for() loop nested in the 03 loop. This loop is similar to the previous loop, and its number of loops is 120. After the loop is nested with the previous loop, the total number of loops is 120×k times.
Line 05: The first semicolon, indicating L empty statements, takes up one machine time to achieve the purpose of delay. In the latter two "}", the first "}" is the end of the 04 line for () loop, when the program encounters it, it will automatically return to the 04 line, the variable j used in the loop count plus 1, and judge Whether j is less than 120, if not, then go to line 05; the second is the end of the 03 line for () loop, the program will return it if it encounters it.
Line 06: The end of the Delay() delay subfunction.
Line 07: Declare the main function main(). The main function here does not require parameters and does not return function values.
Line 08: The start flag of the main function is "{".
As with the Delay() delay subfunction of line 01, it is customary to write the statement of the next line together with the curly braces of the line.
Line 09: Declare an unconditional for() loop, ";;" to allow the microcontroller to repeat the task so that the flow lamp can continue to flow.
Line 10: Braces indicate the beginning of the 09 line for() loop. The statement "Pl_0=0" is to let the O pin (ie Pl.0) of the P1 port of the MCU output low level. According to the circuit, LED1 will It is lit.
Line 11: Call the Delay() delay sub-function declared on line 01 with the parameter value 1000, so that when the program runs here, the delay is 1000 milliseconds (that is, 1 second).
Lines 12-41: Same as lines 10 and 11.
In short, the role of 10-41 lines is to sequentially illuminate the eight LEDs LED1-LED8.
Line 42: End of line 09. When the program runs here, it automatically returns to line 09. Because the for() loop of line 09 is an unconditional loop, the program will immediately go to 10 lines to continue running.
Third, the software imitation
First, first create a new project according to the previous method, and input and save the above program according to the previous method. Then follow the method below to perform simulation debugging.
1. Add the established C program to the project
Double-click "Target1" in the left project window, expand the "Target1" folder, then right-click "SourceGroupl", select "Add File to Group 'SourceGroup1' (AddFilestoSourceGroup1)", and add the C program you just entered to the project.
2. Concatenated target program
Set the output attribute of the target before the build, otherwise the compiled target program does not contain the hex file used to solidify into the MCU.
The way to set the target output properties is:
First click on "Target1" in the project window to select it, then select "Targets' Targetl' property (OptionsfortargetTargetl) in the "Project" menu, the system pops up a dialog box, select the "Output" option in the dialog box. Card, and select the "Create HEX file (CreateHEXFile)" option (generate hex file), of course, if your microcontroller programmer does not support hex files, you must use the conversion software to generate the hexadecimal The file is converted to binary.
After setting the target properties, press "F7" to start the build target program. The result information of the build will be displayed in the output window. If "0 error (s), 0 warning (s) (0Error(s), 0Warning(s))" is displayed, the link is successful, otherwise the link is unsuccessful. . If the connection is unsuccessful, the line of the error and the cause of the error will be displayed in the output window, and then the modification will be made according to the specific error. After the modification is completed, it will be re-edited until the connection is successful.
3. Simulation debugging
After the target program is compiled, the simulation can be started. The steps are:
1) Select "Start/StopDebugSession" in the "Debug" menu to enter the simulation debugging state.
2) Select “Port1†in the “I/OPorts†option in the “Peripherals†menu to open the I/O port status simulator. "&raDIC;" in the status simulator indicates that the corresponding I/O port pin status is "1" level.
For example, the figure shows that the eight pins of Port1 are all "1" level.
3) Press “Fll†to perform single-step tracking and debugging. Each time you press “Fllâ€, the program will execute one step (ie one statement). If the execution of the program affects the state of the I/O port, there will be a corresponding display on the I/O port status simulator. Because each time you press Fll, the program only executes one step, so there may be many steps when debugging the loop program. For example, in this example, each loop in the Delay() sub-function is debugged, and the number of steps is up to 60,000. Step, so try to reduce the number of steps, in this case, you can first change the parameter value of the Delay() sub-function from 1000 to 1, and then change back to 1000 after successful debugging, which can greatly reduce the number of loop steps.
4) Select "Start/StopDebugSession" in the "Debug" menu again to exit the simulation debugging state.
Fourth, the program is cured
When the program passes the simulation debugging, you can use the programmer to solidify it into the MCU, and insert it into the circuit board to enjoy your labor.
Insulated Power Cable,Bimetallic Crimp Lugs Cable,Pvc Copper Cable,Cable With Copper Tube Terminal
Taixing Longyi Terminals Co.,Ltd. , https://www.lycopperlugs.com